Brian Clare on Ignition & Asana
With Zapier, connect PI and Asana to kick off work in your project management platform automatically
Last you heard from me, was when I penned an article on using Zapier to pull your sales workflow together by integrating Pipedrive with Ignition. That article was looking at your pre-sales process, helping you streamline management of leads and get them into PI to create your proposal and sign a new client.
Today, I'm talking about ways you can take an accepted proposal and start populating your project management platform with tasks and projects to get client-work kicked-off. 🎉
Why automate workflow from PI?
By integrating PI with your workflow app (Asana in this case), you can save a ton of time by not having to manually create projects, tasks, and workflows in your workflow app every time a new client decides they want to work with you. This means that you’re able to automate the information flow from proposal acceptance to workflow app.
For example, you no longer need to wait for your sales team to notify you about a new customer to kick-off your onboarding workflow.
This also means that there is no gap between the sale closing and the revenue-generating work beginning. In other words, you can drastically speed up the “time to revenue” metric.
PI’s Native Workflow Integrations
Before I jump into how you can do this with Asana, I want to highlight two great products that have native integrations with PI; Karbon and Xero Practice Manager (XPM).
If you don’t know either of these products, you should. They’re both highly regarded as excellent options for project management within your Accounting Practice. Especially if you have a few (or more) employees.PI and Karbon or XPM have taken care of the integration for you, based on best practices. There's need to set up a process through Zapier to get the same result.
The features are powerful. For the size of my firm (2 partners), we chose Asana. Here’s a quick breakdown of the two products:
Karbon
Karbon is a robust work and communication hub that practices of all sizes use to track client communication from first contact as a lead, right through the customer journey. It allows the partner, to keep a close eye on how work is tracking and the capacity of their team at a glance.
When a new client signs their Ignition proposal, it automatically logs details of the onboarding process in Karbon, updates client information on the dashboard, and creates work and tasks for the team.
Xero Practice Manager
Xero Practice Manager allows you to manage workflow and recover costs quickly with the real-time view of ongoing jobs and work in progress. You can quickly create tasks and monitor staff performance, client profitability and other relevant measures.
When a new client signs their Ignition proposal, it automatically creates all relevant jobs throughout the length of the engagement, updates client information on the partners’ and managers’ dashboard, and creates work and tasks for the team.
Why Asana?
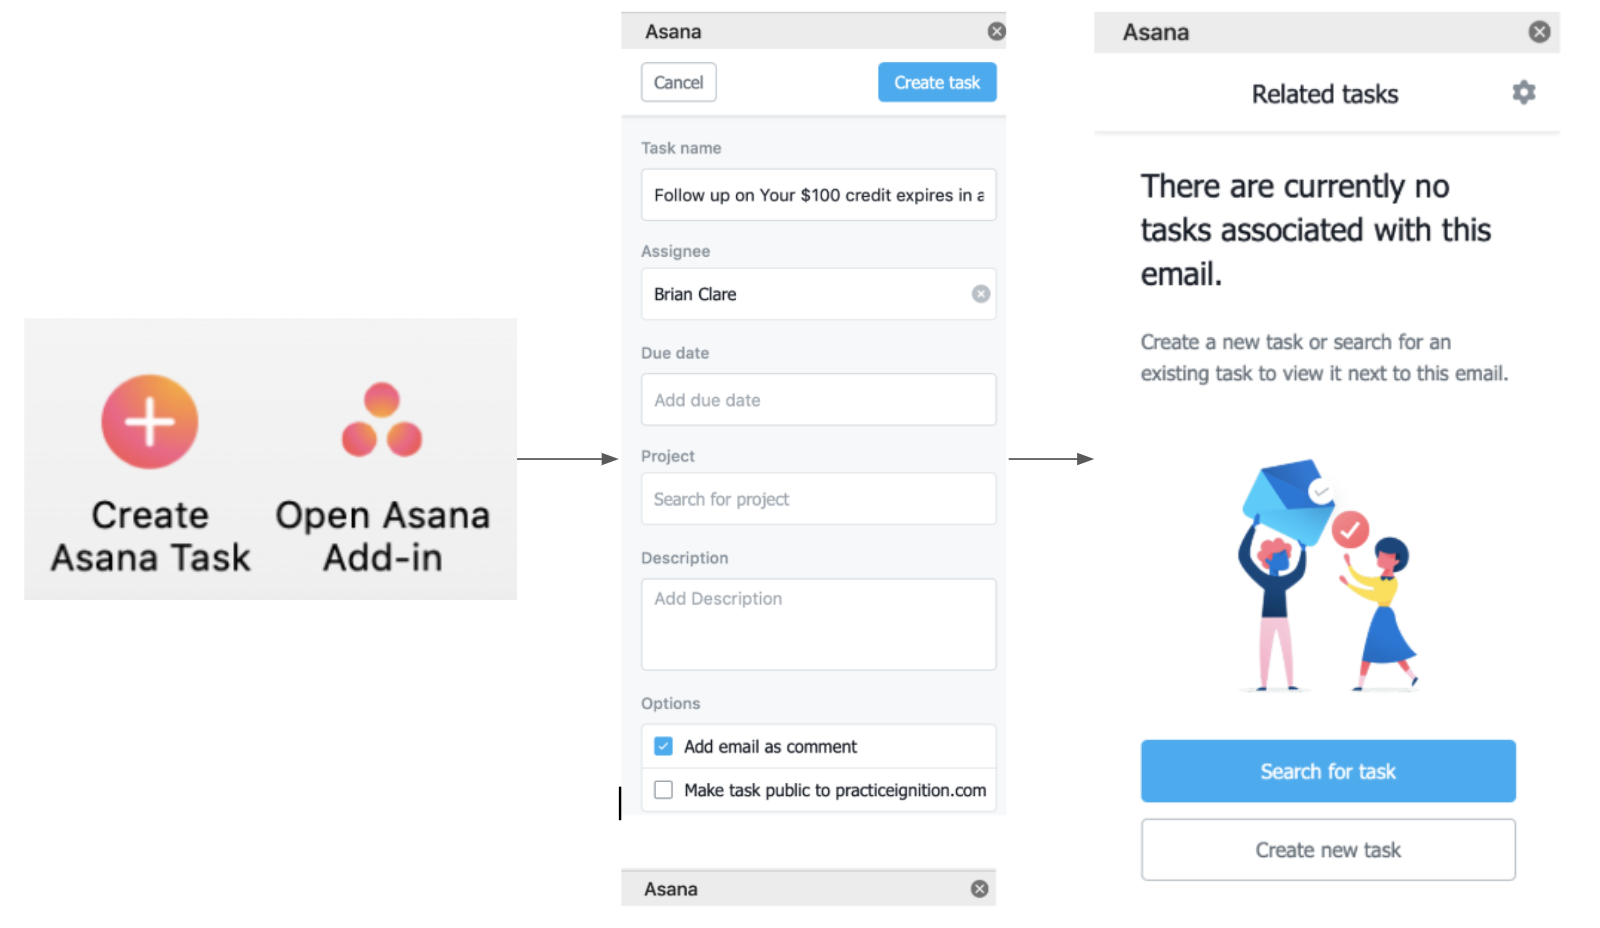
As for Asana, I use it in my firm and it works quite well when you can Zap information from PI to Asana. I’ll assume most readers are on either GSuite or Microsoft 365. If so, that’s great. Why? Because there is a chrome extension that you can add to your GSuite or MS365 that easily allows you to create tasks from an email. That’s a key feature that differentiates Karbon and XPM - you can link your email directly inside of those platforms. But, at least we have this chrome extension to the rescue.
Here’s what it looks like in Outlook. The first screen shot shows the two buttons you can pick from to add a task from an email. The second and third screenshots show the details behind clicking each of those buttons.
Now that you know a super quick way to get information from your email into Asana, let’s take a look at Asana itself and understand some of the features available.
Breakdown of Asana Features
I would have to agree with this!
The first feature that comes to mind is beauty. Is that a feature? No, not really, but damn Asana looks good. So, let’s actually call this the User Interface (UI). Asana’s UI is so easy to navigate around and understand what’s going on. It’s bright, colorful, it just makes sense. You don’t have to be a genius to understand how to use Asana.
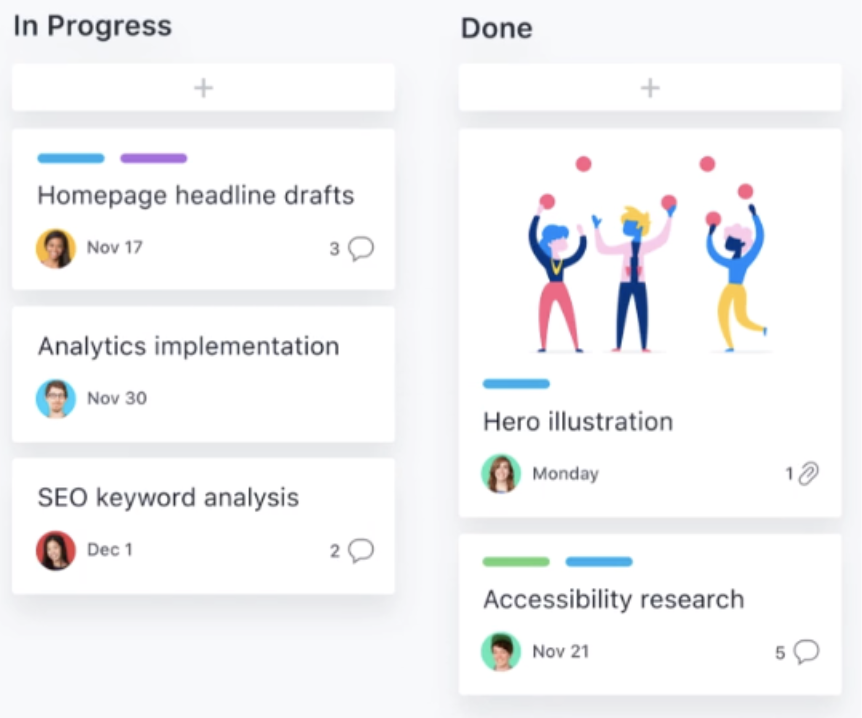
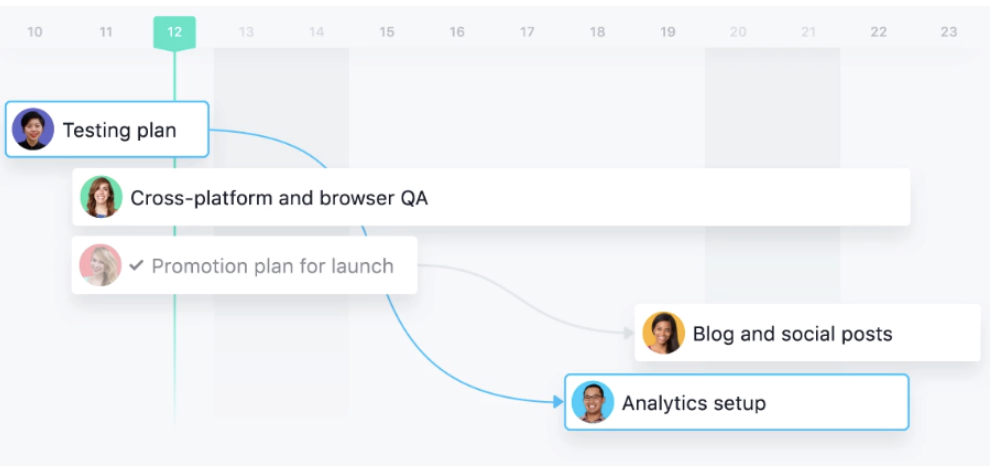
Are you a fan of checklists? Great, Asana has that. Not a fan of checklists? Even better. Asana allows you to create Kanban boards, too. Here’s what they could look like, with some additional setup of course.
There are a ton of other features too, such as:
- A calendar view to monitor workload and see the bigger picture of ongoing and upcoming work
- Direct integrations with over 100 of your favorite apps like Slack, GSuite, MS365, Dropbox, etc.
- A Portfolio view to monitor the status of projects in real-time, allowing you to address issues quickly and efficiently
- Custom Fields to track… ANYTHING! We use it for priority (high, medium, low) and status (in-progress, waiting, need help, off-track, blocked)
- Templates, Privacy, and more
Walt Disney once said, “Disneyland will never be completed. It will continue to grow as long as there is imagination in the world.” Asana can be your Disneyland, just use your imagination and you can build your workflows however you want within Asana.
You probably didn’t expect a Walt Disney quote in a blog about PI, Asana and Zapier, but here we are. Let’s have a look at how Asana can be used with Zapier.
Breakdown of Zapier Triggers and Actions in Asana
Asana has some pretty robust Triggers, Actions, and Searches. Asana has 11 Triggers and they are very powerful:
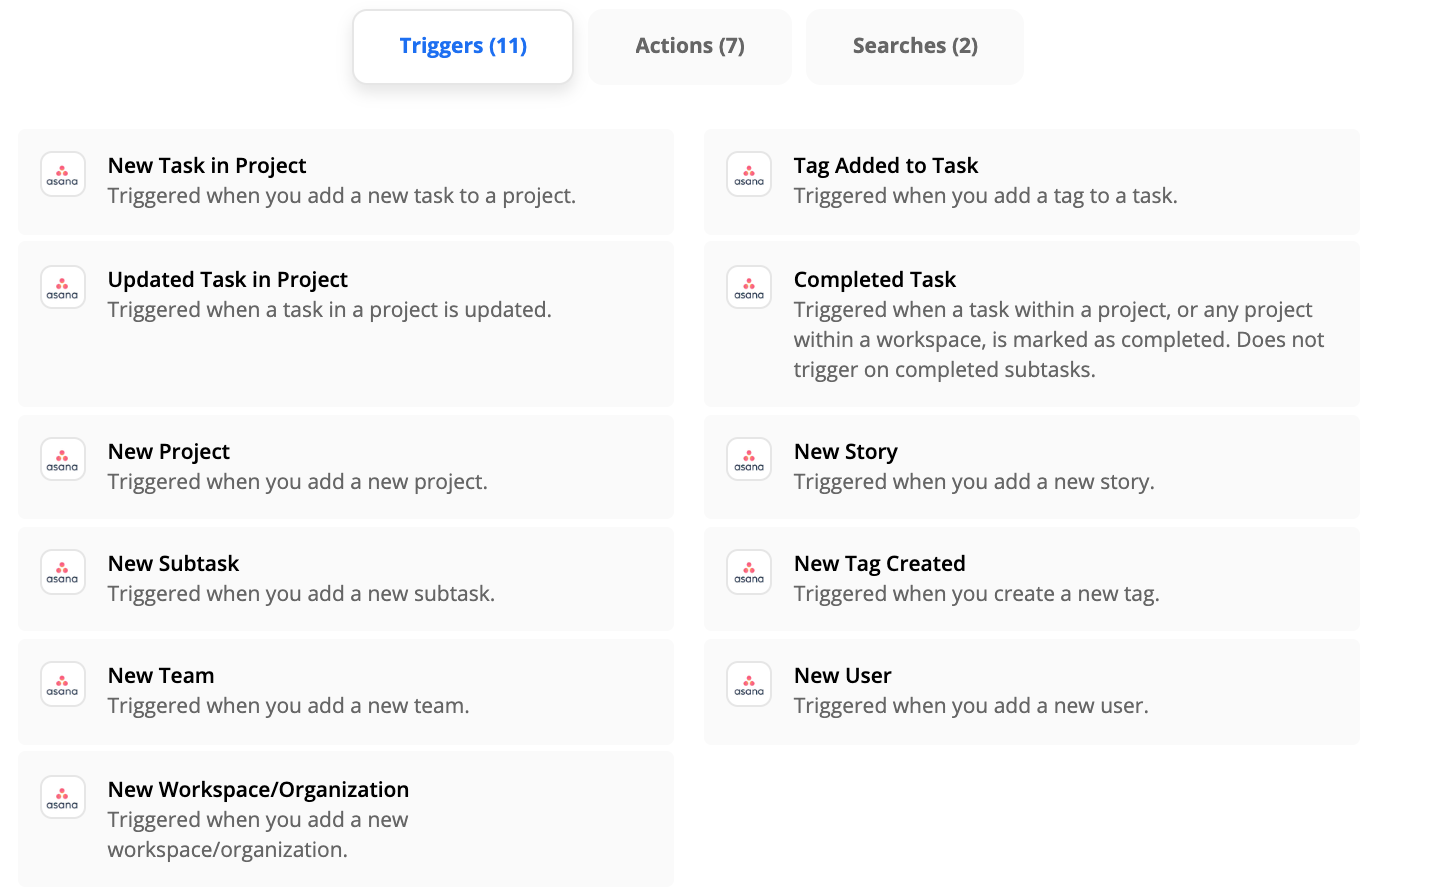
Have a look at some of those Triggers and what do you see? So many different ways to kick off multiple workflows from updates on projects, tasks, and subtasks. I’ll touch on some examples down below.
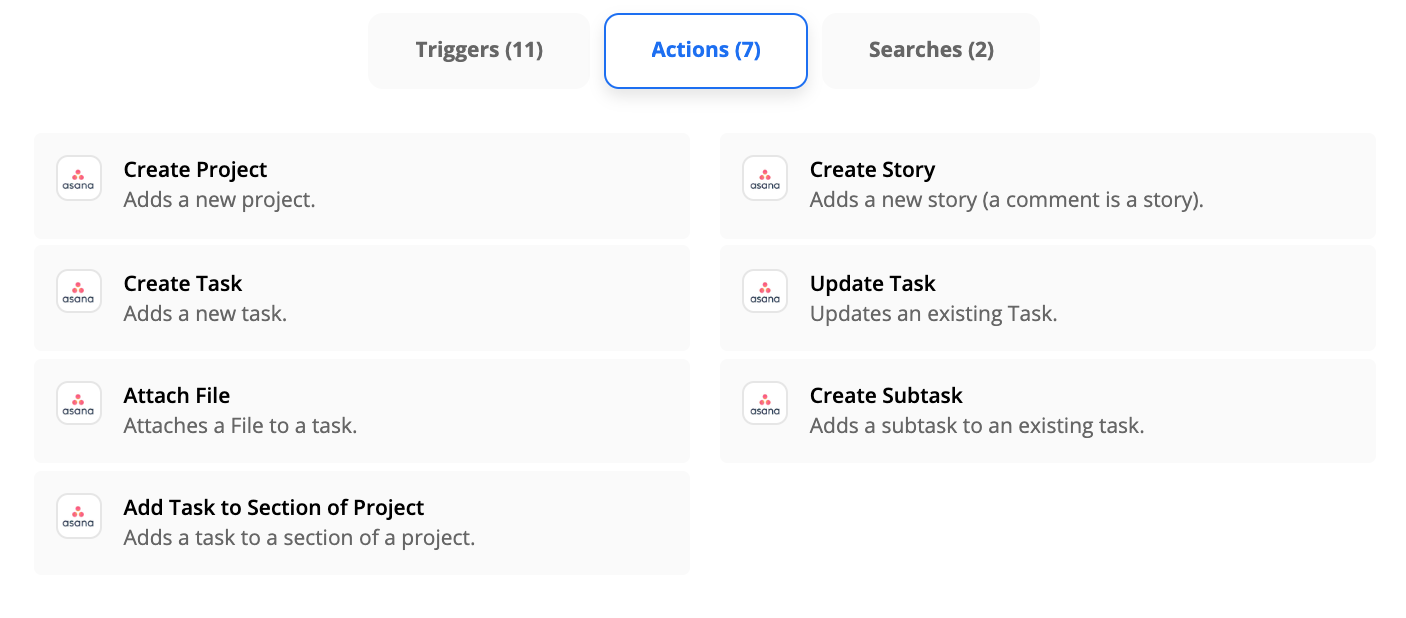
How about those 7 Actions?
Finally, we have the 2 Searches:

I love Search actions in Zapier. They really do save you from duplicating information within an app. An example of this would be instead of adding information to a project automatically, maybe you only want to update the project. You would use a Search action to find the project and update it with some of the Actions mentioned previously so that you don’t end up with duplicate projects or information within a project.
The best way to get new projects and tasks into Asana
As you’ve seen from the Triggers, Actions, and Searches, there are a ton of ways to move information around and get it into Asana.
The real reason you’re reading this, though, is to understand how information moves from PI to Asana. The goal of such a workflow is so you don’t have to manually update Asana each time a new client is added to your client roster.
Let’s consider how this scenario would play out if you didn’t have this integration. Your salesperson (maybe that’s you) would interact with the prospective client to figure out what services they need. You create a proposal in PI with these services and the client accepts the proposal (Yay!).
This is where it becomes extremely manual to update your workflow app. Of course, you can create a templated project in your workflow app (such as in Asana), which you can then copy to create a new project for your new client. But that doesn’t guarantee that the project will be accurate. It might be missing some tasks you need to include, and include some tasks you don’t need, resulting in potential confusion, ambiguity, and worse, scope creep.
This is where the true power of Ignition comes in. At a high-level, once a proposal is accepted, we can automatically create the client project and tasks specific to that client based on the service(s) in the proposal. The secret is the fact that each service is treated separately, allowing you to decide how your projects, tasks and sub-tasks are created.
Before you start Zapping: get your service library organized.
Given that the key to this workflow is your services, it’s critical that you organize your service library correctly in PI. The best way to do this is to:
- Define your service “categories”
- Apply a naming convention.
At Blueprint, we took a good look at our services to decide on our service “categories”. These categories lay the foundation for our workflow. We have 5 categories:
- Bookkeeping
- Solopreneur (i.e one person businesses where we do just bookkeeping and bank reconciliations)
- Corporate Taxes
- Personal Taxes
- Self-employed Taxes
With our categories defined, we then built out our service library with a list of services that fall under those categories. PI allows us to have as many services as we want, so we created several services within each category, which increase in scope and price based on the size of the client or the complexity of the work.

Going forward, any time we create a new service, we apply the same naming convention:
(keyword) - brief description of service (primary definition of scope).
You’ll want to come up with your own naming convention for your library too.
How to create the PI to Asana Zaps.
To achieve a sturdy Ignition to Asana workflow, you will need to use two zaps.
The first zap will look in Ignition to see if your client is brand new to your firm, or an existing client that is signing a renewal proposal (or change request). If the client is new, the zap will create a project for you. If they are already a client of yours, the zap will find your existing project, allowing you to add new tasks there.
The second zap then looks at the services in your proposal so that you can decide what happens next, based on the services that were accepted.
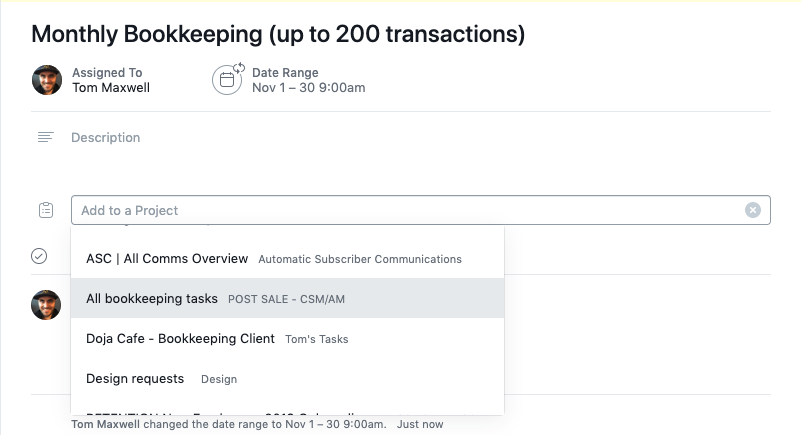
Let’s take a look at the following proposal as an example.
In the below image we can see that we sent a PI proposal to a client (let’s assume they were brand new). The proposal had 3 separate services.
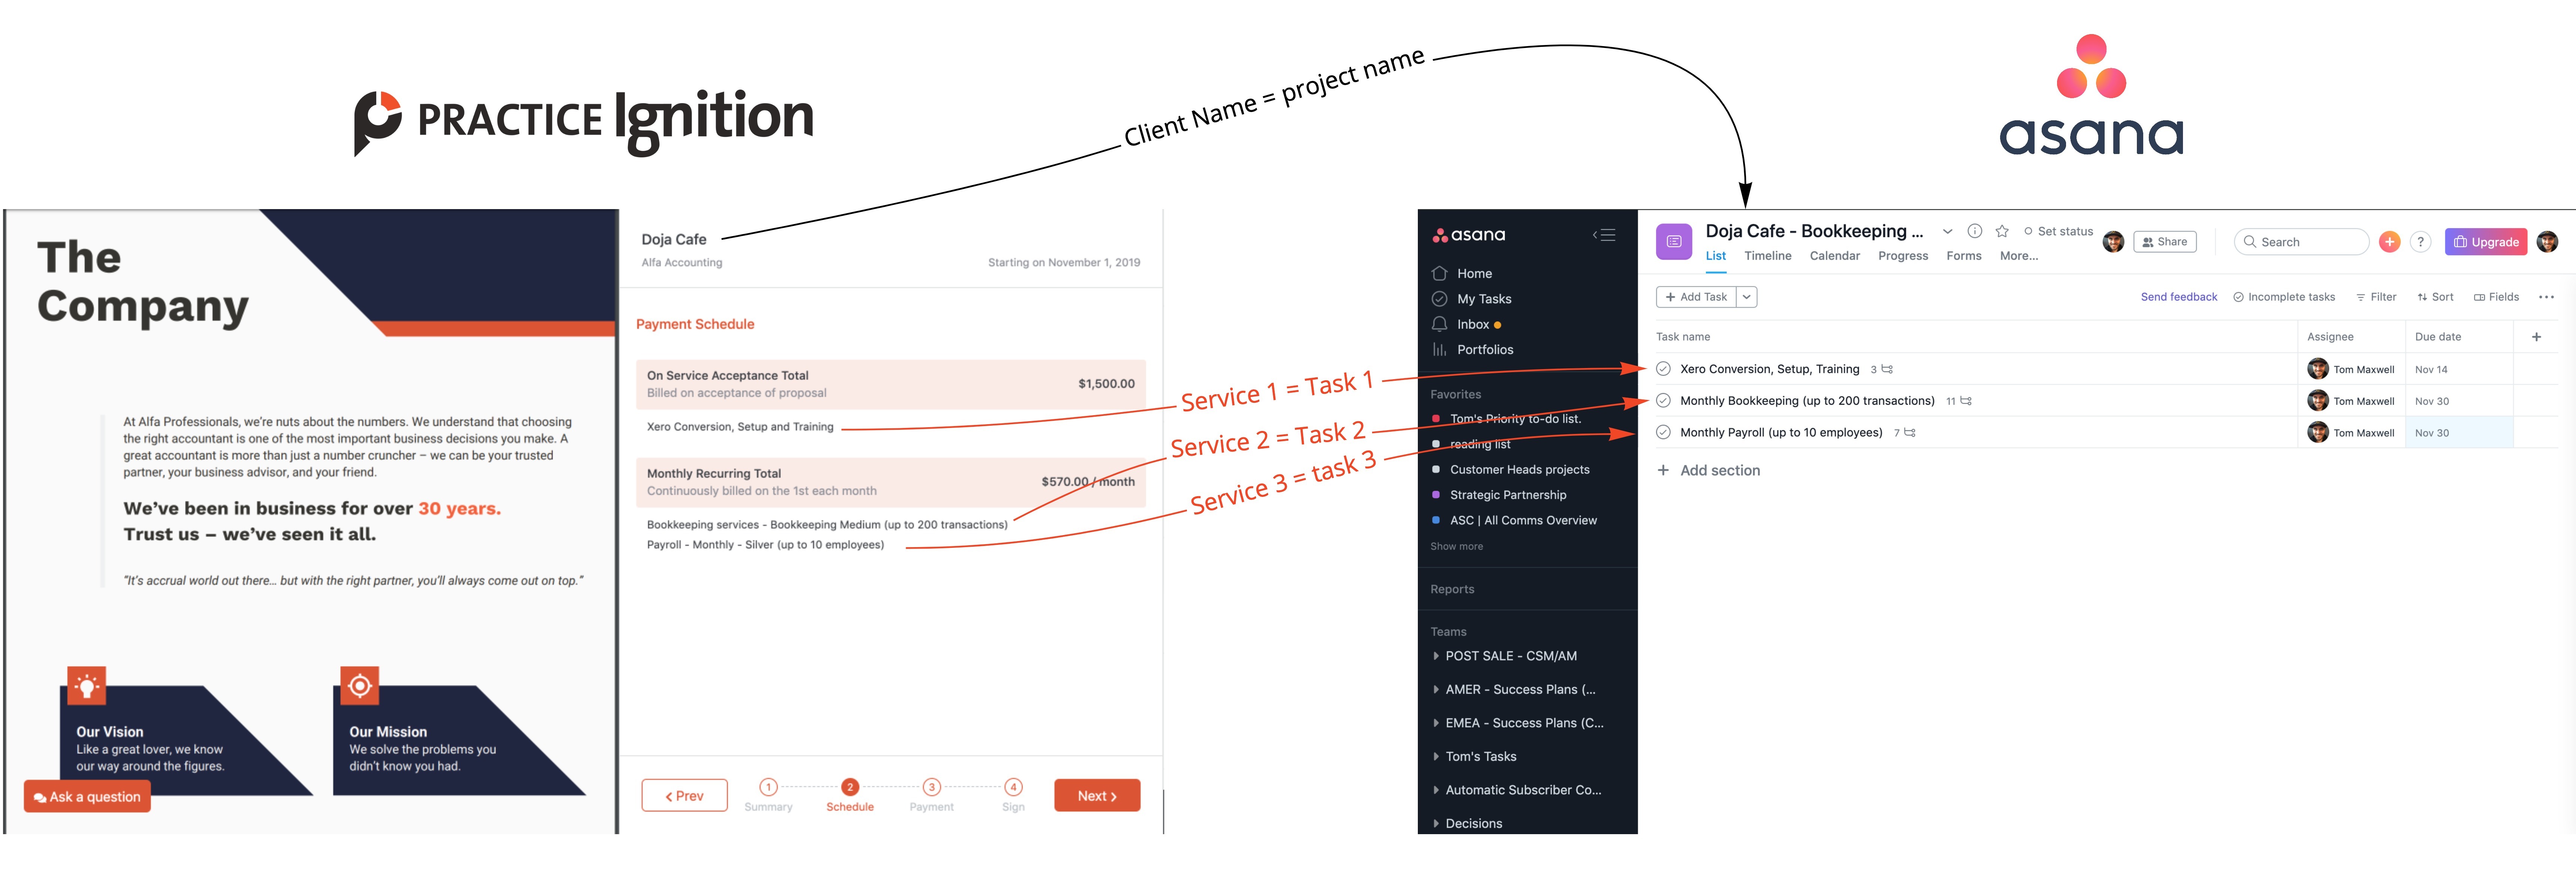
The client accepted the proposal so my first zap checked out whether they’ve accepted a proposal before. It turns out they haven’t, so Zapier went ahead and created a project for me in Asana.
Next, I needed some tasks. Each service in the proposal requires its own task and sub-tasks (i.e. the things we need to do to be able to complete the task), and potentially, could be done by different people. Furthermore, one task is a one-time service, while the other two are monthly recurring services. So In our project we need to treat these tasks as separate. My second zap has gone ahead and created three separate tasks in the correct project.
With Zapier, all of what I’ve described so far has happened automatically. The true benefit of this is that every project will be a 100% accurate reflection of what your client has accepted.
Finally, I just need to make some slight tweaks directly in Asana (such as assigning tasks to my team and changing the recurring services to recurring tasks) and I’m all done.
If you want to replicate this exact workflow, read on below.
Please note: if you want to replicate this project, you’ll need the pro version of Zapier, so that you can use paths. If you don’t have pro, that’s ok. At a bare minimum, you will need a paid version of Zapier so that you can use multi-step zaps.
If you don’t want to go Pro with Zapier, anywhere you see a “path” in the instructions below, you can simply create separate zaps. This will quickly eat up your allowed # of zaps.
Step 1: Create a project
We need to start by creating a project. However, we need a way to tell the difference between a “new client” vs. an “existing client”.
At Blueprint, we’ve created an onboarding Zap that utilizes Paths so that we can delineate between a new client and a renewal. Each of these Paths has a specific purpose because there are different Actions that we want to happen based on whether this is a new client or a renewal.
Here’s what you need to do:
1. The Trigger App is Ignition and the Trigger Event is New Proposal Accepted
2. The first Action App is Paths. You need two paths in your zap
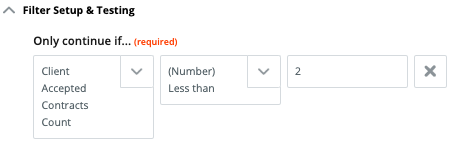
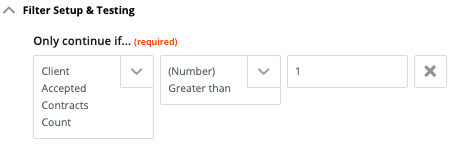
3. For each path, the rule will look at the PI field ‘Client Accepted Proposal Count’. What this field provides is, you guessed it, a count of the number of proposals accepted by a client.
For new clients (Path 1): create your rule so that ‘Client Accepted Proposal Count’ is less than 2.
In this case, the video below is going to show you how Paths work, as well as show you how to add a task to a project. Check out the video below on how to set up this Zap.
If you have other tasks you want to automate in other apps, such as updating your CRM (like I showed you in the Pipedrive article), adding your new clients to your marketing systems, or even just celebrating with your team in Slack, this is where you should put these tasks.
Step 2: Set up specific tasks based on the services in your proposal
A second Zap that you will create from PI is actually on a service acceptance. This is different from a proposal acceptance above because you can now focus your Zaps to do certain Actions based on specific services in your PI service library. The naming conventions we’ve applied to our PI services allow us to make some really robust Zaps.
Here’s what you need to do:
1. The Trigger App is Ignition and the Trigger Event is Service Accepted by Client
2. The first action you’ll choose is “Delay by Zapier”. This native Zapier apps puts the brakes on everything for a chosen period of time. Why would you need this? You want to ensure a project exists before you start creating tasks. Putting a delay in this zap gives the first zap enough time to create a project for you, if your client is new (you only need 1-2 minutes).
3. The second action App is Asana, and the Action Event is Find Project. Once you’ve connected your account, you’ll also want to check the box that allows the zap to create a project if it cannot find the project. This should never happen given the first zap takes care of creating the projects, but this is just to be safe.
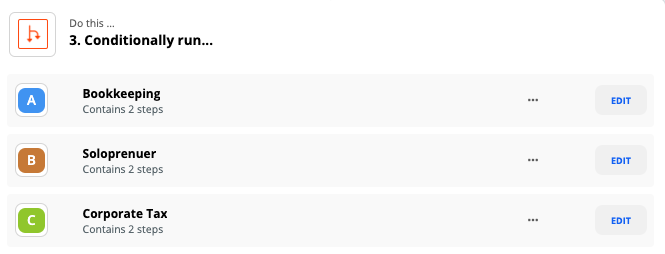
4. The next action step is to select paths. This is where we start to set up the actions we want to happen for each service you provide. Let’s assume your PI service names have keywords for your service categories included. So now you are going to create a path for each service category:
PRO TIP: You can pass the service description from Ignition into the task description in Asana. This means that the person working on the task has an accurate scope of work based on what the client agreed to! So if you customized a service in your proposal, it’ll automatically reflect in Asana.

Step 3: Configure your tasks in Asana
Once you’ve made your two zaps live (from step 1 and 2), all of your tasks for all of your clients will be automated from this point on. Congratulations!! All that is left is a couple of steps that you need to take each time tasks are created for you in Asana:
1.Set up relevant tasks to recur based on how frequently you need a new task created. For example, if you need your bookkeeping task to repeat on a monthly basis, simply click into the task in Asana and change the recurring settings. Repeat this action for all of your tasks that you need to recur. Yes, it is a manual step, but it takes seconds to complete. Unfortunately, you can’t set up repeating tasks in Zapier (hopefully one day!)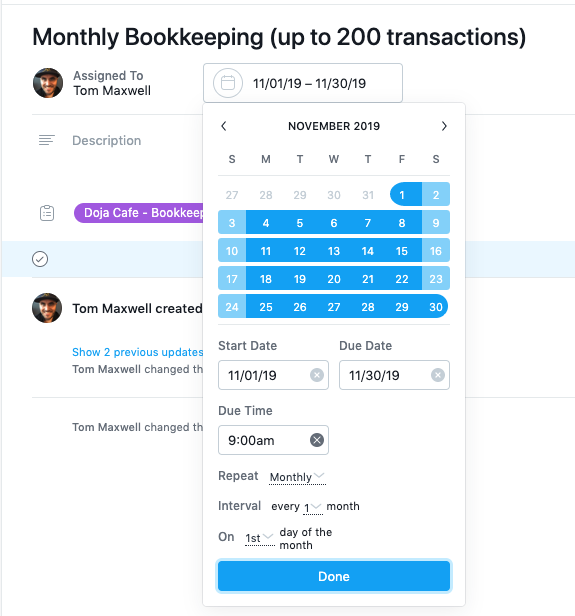
2. Re-assign tasks to relevant employees, add notes, and apply any other changes that you'd like! If you’re rolling solo in your practice, you can just assign all tasks to yourself directly in Zapier! If you have employees, you will need to take this step. Again, it takes seconds to complete.
But wait!
There’s just a few more things to consider here. These are decisions that you need to make about how you want to run your workflow and present services to your clients. There’s no wrong answer here at all, but you’ll definitely want to take your current process and workflow into consideration when coming to your decision.
A decision to make: Project by client vs project by service
There are two schools of thought that you can use to set up your Asana account: by client or by service. This can depend on how you have your business set up. As an accountant, these thoughts also apply to how employees work with clients: 1) an employee works the entire end-to-end bookkeeping for a single client, or 2) employees work on multiple clients but only completing one service. An example of number two would be an employee only working on accounts payable across all clients.
As mentioned, you can set up your Asana by client or by service. OR, you can do both. Remember the Walt Disney quote above? Use your imagination with Asana and you can set it up whichever way works best for you. Now, I can’t take credit for this idea, so here’s a link to Scott Hoppe’s video on how to set up Asana by service AND by client. In my opinion, this is one of the best ways to set up Asana because you get both views so you can keep track of all client tasks as well as by service.
If you don’t want to watch that video, here’s what it basically entails. If you are looking to set up Asana in an efficient way, I highly recommend watching Scott’s video. Here’s the gist:
- Set up a new project for every client
- Set up a new project for every service. You can make this as detailed as you want. At Blueprint, we have service projects for bookkeeping, taxes, consulting, and combined. Combined gives us a view of all other service projects in one place
- As you add tasks to your client projects, you will add the service project associated with that task (if that doesn’t make sense, do check out the video - it’s well worth it).
A decision to make: Bundling services vs individual services in PI
As you have seen above, you can Trigger Zaps by a proposal or service acceptance. How you Trigger your Zaps can also depend on if you create your PI service items using keywords (like Blueprint does) or if you bundle them together under one service. In the case of keywords, you’ve seen some examples above. But what would a bundled PI service item look like in a Zap? First, let’s talk about what a bundle is.
A bundle is just as you’d expect - it’s a grouping of services under one name inside of the PI service item list. An example might be bookkeeping as a service item. Within this service item the description could include bank reconciliations, accounts payable, accounts receivable, and/or historic account reconciliation (clean-up work). The good thing about a bundle is that you do have the option to separate them within Asana - you just have to manually type in each task that is within the bundle. Not a huge issue, but it is manual. Or you could automate the task creation.
To automate the task creation what you can do is create individual tasks on a project even when a bundled service item is used. For example: let’s say you have the above bundled service item of bookkeeping. And let’s also say that bookkeeping always includes bank reconciliations and accounts payable. In this case, you could create a Zap with a filter so that whenever the bundle says bookkeeping then we add tasks for bank reconciliations and accounts payable to a new or current project. Using Step 2 above, you could create tasks and subtasks based on the naming convention of your bundled service and the individual services bundled within.
Being an automation aficionado, I do have to say I prefer having services separated within my PI proposal. The biggest reason for doing this is that it gives you a layer of detail that you wouldn’t otherwise have if you bundle your services into one service description. If you haven’t noticed this yet, the PI dashboard gives you a glimpse into what services are producing the most revenue for you. You wouldn’t be able to measure this so easily in a bundle. A second reason to unbundle your services is that you can automate more easily if you have individual services. As you’ve seen in some previous Zaps, you can create filters and Paths based on service descriptions. Using individual service descriptions means you can pass on more detailed information to Asana to create projects, tasks, subtasks, etc., all based on the service description.
Want to see something cool?
But if you want to get fancy, you’re more than welcome to copy our 58 step zap that we’ve created for our practice. What we’ve done is combined all of our onboarding zaps into ‘one Zap to rule them all’.
We do this by nesting paths within paths. What I mean by this is if you have keywords in your PI service items, then you could conceivably create one Zap that starts off going down a bookkeeping path, then within that path it could go down one of two paths for new or renewal. You could then add a second path at the same level for specific taxes that you’re completing - think personal, corporate, self-employed, for example. Within those paths you could again have nested paths for new and renewal. Remember that Disney quote? The applies here if you want to get really advanced with Paths.
Here it is in all it's glory
Recap
You’ve made it to the bottom of this article for the recap. I must be doing something right! So, here’s what we’ve learned today…
- Ignition can absolutely be your Trigger to set up projects and tasks automatically in Asana
- There are tons of opportunities to automate project and task creation within Asana using 11 Triggers, 7 Actions, and 5 Searches
- There’ll be two zaps in your workflow: one to check if your client is new or existing (and subsequently creating projects if needed), the other to create your tasks based on your services. With just a few tweaks to your tasks in Asana, you have a powerful workflow.
All of the above should save you a lot of time and headaches with manual data entry between Ignition and Asana.
Happy Zapping! – Brian


